
iOS devices (iPads, iPods, and iPhones) are intricate devices loved by many people worldwide. They are known to perform various functions with profound intelligence and precision. However, no device is immune to software or hardware-related issues, and iOS devices are no exception.
In case of software challenges or upgrade/downgrade requirements, you can get around them with the help of Recovery Mode and DFU Mode. These modes will help you overcome the issues and make your phone usable.
The DFU and Recovery modes come in handy when your iOS device becomes unresponsive. They are inbuilt mechanisms to restore your phone to a functional state. The device’s unresponsiveness can sometimes arise from a recent application or iOS update.
The DFU and Recovery modes are often used alternately, but they differ in purpose and scenario. Each mode is ideal for specific challenges. You might have already used one of the data recovery modes or even resuscitated your iOS device.
Although these two modes perform similar roles, there are specific roles unique to each. This article will make you understand when to utilize which mode.
Here are the explanations.

What is DFU Mode?
The DFU (Device Firmware Upgrade) Mode is the most sophisticated of the two options. The iOS system bypasses the iBoot bootloader and connects directly to iTunes or Finder when resolving critical software issues.
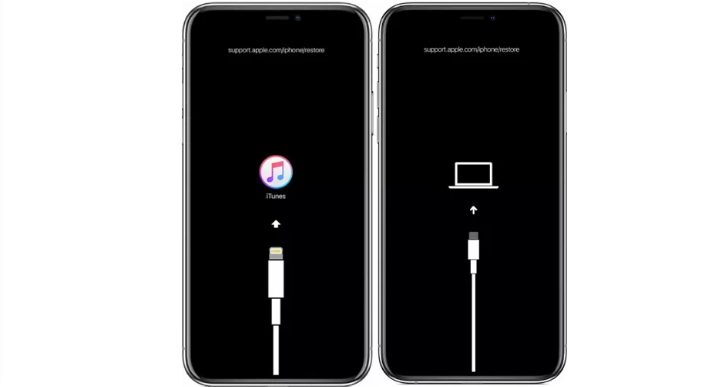
In the DFU Mode, your iOS device will display a black screen. This mode will fix your device’s issues arising from jailbreaking. Jailbreaking is a term used with iOS devices to mean the removal of software restrictions set in place by the manufacturer to allow you to install third-party software, just like Rooting in Android devices.
You can use this mode to install an older version of iOS. You can also use it to update the system to a later version.
Also Read: iPhone Won’t Restart In Recovery Mode. How To Fix?

When To Use DFU Mode?
There are specific instances when you can utilize the DFU Mode, including:
- When restoring your iOS device to a previous state – You may want to downgrade to an earlier version of your device’s system.
- When you want to install Pwned iOS, you must work through the DFU Mode – A Pwned system has been cracked or pre-registered and is controlled by a third-party program.
- When you want to jailbreak or un-jailbreak your iOS device
- When removing the beta system version from your iOS device
- To resolve the boot loop on your device – A boot loop occurs when you turn on your device, but the splash screen keeps iterating without allowing you access and gets stuck on the Apple logo.
Also Read: How To Fix Apple Id Verification Failed Error?
How To Enter DFU Mode?
If you have earlier versions of iOS with devices running on the same system as the iPhone 6S, you can follow this procedure:
- Connect your device via a Macbook with iTunes or Finder and launch the app.
- While your device is off, hold the lock and home buttons simultaneously for about ten seconds.
- Leave the lock button while holding the home button until iTunes or Finder recognizes the iOS device. You will notice that the screen will remain black.
For iOS devices running on versions similar to iPhone 7 or 7 Plus, you can follow these steps:
- Connect your iOS device to a Macbook via USB.
- Press the volume-down and side buttons simultaneously.
- Stop pressing the side button while you continue pressing the volume-down bottom.
- iTunes of Finder will recognize your iOS device and display a black screen. Of course, by this time, you should have launched iTunes or Finder on your Macbook.
And if you have a device with a system similar to iPhone 8 and later, you can follow these steps:
- Connect your iOS device by USB to your Mac.
- Simultaneously press the volume up and down buttons fast, starting with the upper button.
- Hold the side button till the time the black screen appears. After that, press both the side and the volume down buttons. As you enter the DFU Mode successfully, you have a raft of options at your disposal, but you need to be careful not to take actions that can tamper with your device.
- Keep pressing the volume down button as you leave the side button after about five seconds.
- iTunes or Finder will notify you that your iOS device is undergoing recovery in the DFU Mode.
Also Read: Why The Top Left Of iPhone Screen Is Blurry? How To Fix?

iTunes or Finder will always notify you from time-to-time, throughout the process. If you see the Apple logo or a notification to connect to iTunes or Finder, you should retry the process.
The Apple logo splash means that the DFU Mode entry failed, and the iOS device usually attempts to start. You probably held the buttons for longer than stipulated.
Also Read: Notifications Silenced On iPhone – What To Do?
Exit DFU Mode
Just like entry into the DFU Mode, the process of exiting the mode varies across devices.
For iOS devices with the home button, including iPhone SE and iPhone 6s, you need to hold the lock button and the home button to restart the device.
Hold the volume down and side button for iPhone 7 Plus and iPhone 7 until your device restarts.
For iPhone X, iPhone 8 Plus, and iPhone 8, hold the volume up, side, and volume down buttons until your iOS device restarts.
Once you’re done with this process, you probably have downloaded and installed your favorite software. Your device will require some time to calibrate. This can take up to a couple of weeks.
During this calibration period, you will need to charge your iOS device to 100% and discharge it to 0% many times as you use it. So then, after the calibration, you can consider the issue with your device permanently resolved.
However, if the issue recurs, then perhaps it’s time you replace parts or even buy a new device.
Also Read: How To Fix iPhone Is Disabled. Connect To iTunes
What is Recovery Mode?
Recovery Mode is often known as the second-stage loader. This mode will help you recover your iOS device whenever it becomes unresponsive.
The unresponsiveness can be so irritating that you’d want a quick fix to continue using your device or accessing data. It will start your phone and iBoot, a bootloader mode.
When your phone, for instance, enters the Recovery Mode, you must first put it into the iBoot mode. This action allows your phone to accept commands through USB connections with your Macbook so that you can bypass iOS restrictions. Your device will respond to specific commands in this mode.
Check Out: How To Check Your iPhone For Viruses & Malware?
When To Use Recovery Mode?
There are instances when you will need to put your iOS device into Recovery Mode. Here are the scenarios.
- First, you need the Recovery Mode when your device becomes unresponsive for some minutes and shows the Apple logo but has no progress bar.
- When your device cannot handle iTunes or Finder recognition and displays a screen asking you to connect to iTunes or Finder.
- When you need to remove your iOS device from the USB-restricted mode, and yet you forgot or don’t have the passcode required, the Recovery Mode will be to your rescue.
- Also, if you had a jailbreak done on your iOS device, you may not be able to install an upgrade. So, you will enter the Recovery Mode to upgrade your Apple device without any restrictions.
- If you think you need to clean up your iOS device’s system after a jailbreak, the Recovery Mode will come in handy. The Recovery Mode gives you easy fixes to less complicated software-related issues.
- Forgetting passcodes is usually resolved by logging into the Apple website and requesting a reset. But on rare occasions, you can use the Recovery Mode to reset your passcode. However, this action can erase your device’s data completely.
Check Out: How To Find Hidden Apps On iPhone Home Screen?
How To Enter Recovery Mode?
Since iOS devices differ in physical design, you can follow their steps to enter into the recovery mode with your specific device, as elaborated below.
If you have an older model like the iPhone 6S or its equivalent with a home button on the device’s face, these are the steps you can follow:

- Connect your iOS device with a Macbook with iTunes or Finder and start the app.
- Long-press the home button with the lock button on the top or side of your device.
- Continue holding onto the buttons until the Apple logo is displayed. Once you see the Recovery Mode displayed, you can release the buttons.
As for iPhone 7 Plus and iPhone 7, the process is slightly different since they are the first series to be designed without the physical home button. You need to follow these steps to enter the Recovery Mode.
- Connect your iOS device to your Macbook and start the iTunes or Finder app on your computer.
- Hold the side and volume down buttons simultaneously after seeing the Apple logo.
- Release the buttons after your device displays “Recovery Mode” on the screen.
And if you have one of the latest iOS devices, whether it is iPhone X, 8, or any newer versions, it won’t take much time to enter Recovery Mode. You can follow these steps.
- Connect your device to the Macbook via USB and launch iTunes or Finder.
- Press and release the volume plus button for about eight seconds.
- Now press and release the volume down button
- Hold the side button; even as the device displays, the Apple logo, don’t release it.
- When you see the screen display “Recovery Mode,” you can release the side button.
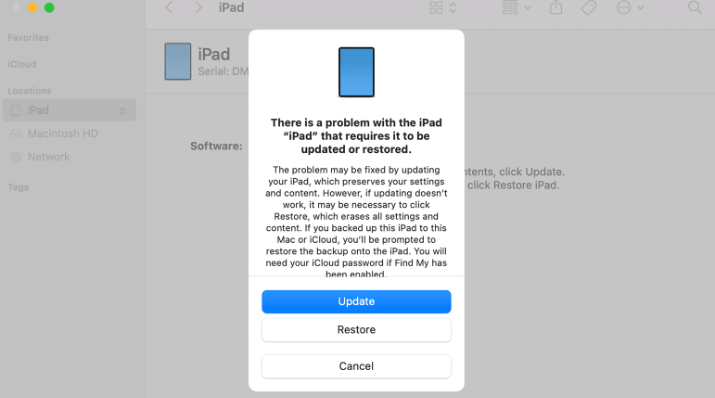
As soon as your device enters the Recovery Mode, software restore and update options will appear that you can choose from to resolve the issue with your iOS device.
Also Read: Ways To Retrieve Deleted Text Messages On iPhone
Exit Recovery Mode
When the recovery process is done, your device will exit the Recovery Mode automatically and restart.
However, you can exit the Recovery Mode without restoring your iOS device. If your device self-resolves the issue upon entering the mode, this is how to exit:
- Eject the USB cable from your Mac and your iOS device.
- Keep holding the side or home button until your device shuts down. This depends on the model of your iOS device. Other models will require you to hold the volume down button. Hold it until you see the Apple logo.
- Release the button to allow your device to restart.
DFU Mode vs Recovery Mode: Differences

Users of Apple devices running on iOS sometimes need clarification about the difference between the Recovery Mode and the DFU Mode. Although these modes are ideal for resolving frustrating events on your iOS device, there are some notable differences. These include:
Also Read: My iPhone Won’t Turn Off Or Open Apps. How To Fix?
1. Mode of Last Resort
You need to enter the DFU Mode if the Recovery Mode doesn’t resolve the issue with your device. The DFU Mode is the mode of last resort; in this mode, you can reload your device’s iOS when the jailbreak backfires.
2. iBoot Bootloader
The Recovery Mode uses iBoot to upgrade or restore iOS devices. The DFU Mode bypasses the iBoot bootloader and allows you even to downgrade your device’s current firmware since no boot agent runs in the DFU Mode. So you can even do upgrades, iOS reinstallation, and more.
3. Device Screen Display
In the DFU Mode, your iOS device’s screen will be totally black, unlike in the Recovery Mode, where you work between Apple logo splash screens.
4. Data Saving
In the DFU Mode, you don’t have the option to save your data before restoring. So, when you enter this mode, be sure to lose all the data you had on your device. The Recovery Mode allows you to back up your data before restoring. However, you’re not guaranteed that you won’t lose your data. So, you need to take precautions.
5. Jailbreaking
It is recommended that you use the Recovery Mode when installing new firmware. But when you need to jailbreak your device using Redsn0w, the DFU mode is required. The DFU mode will not limit your actions. But remember jailbreaking might kill your iOS device in case of an impediment.
Also Read: Best iPhone Widgets
6. Older or Newer System Versions
In the DFU Mode, you can install older versions of iOS, while the Recovery Mode won’t let you do this. So if you loved a feature of a previous iOS version and would like to revert, the DFU Mode will do the trick!
7. Logs
It is also critical to understand that even the DFU Mode and Recovery Mode logs are different. The DFU Mode logs are similar to those of iTunes, just like those of a standard restore.
8. Device Battery Power Draining
The DFU Mode will drain your iOS device battery faster than the Recovery Mode. So you will have to plug your device into a charging port for safety and to ensure the process is not aborted midway.
If your device goes off midway while undergoing recovery in the DFU Mode, the results might be terminal.
Also Read: Difference Between No Location Found & Location Not Available In Find My App
9. Consequences of Failure
In case of a botched jailbreak procedure, you will need the DFU Mode to restore your device. Jailbreak to the iOS might make your device unstable or dysfunctional if the process isn’t successful. The Recovery Mode can not resolve this.
10. iOS Loading
With the DFU Mode, the default operating system isn’t loaded, while in the Recovery Mode, all activities are still managed by the iOS version installed on your device.
More About DFU Mode

The DFU Mode Does Not Always Work
Most people want to use the DFU Mode straight even before trying to resolve the issue via the Recovery Mode.
I would discourage you from doing this. Although you may resolve the issue, there is a significant chance that the DFU Mode might not resolve the issue with your iOS device.
The DFU Mode is Potentially Dangerous
If your device had minor problems like water damage and you used the DFU Mode, there is a possibility that your device will be unusable after the process. The Recovery Mode and physical repair would resolve this issue.
Besides, the warranty will be voided, so your supplier will not honor any warranty, free service, or support agreements.
If you restore via the Recovery Mode, your iOS device will install a clean version of the identical copy or a firmware update. The DFU Mode does these, plus more.
Also Read: Best i-easydrive App Alternatives
Bottom Line
The analysis above explains the scenarios where either the DFU Mode or the Recovery Mode may be ideal and how you can enter and exit each mode.
You must back up your data on the cloud or a different device before entering any of these recovery modes since they will erase your data as they resolve the problems.
The process is more straightforward using the Recovery Mode than the DFU Mode. This explains why the DFU Mode is used when there are complex issues with your iOS device.
After going through this article, you now know how to downgrade or upgrade your device, even how to update the firmware to boost the performance of your iOS device. You can do all these on your own following this guide.


