We all know it can be pretty irritating when Siri takes over your AirPods and reads out your just received text message when you’re listening to a funny podcast or wonderful music.

With the “Announce Texts” feature, Siri can read notifications for Reminders, iMessages, and other 3rd-party apps (such as Snapchat, Slack, WhatsApp, Twitter, and others) via your AirPods, Beats, and CarPlay. You can also respond to notifications without using your hands.
It seems great in theory, but for individuals who receive a great deal of notifications from time to time (ranging from notifications such as incessant group conversations on WhatsApp to Twitter replies from that person you are having an intense argument with), it can be annoying.
Why Is Your Phone Announcing Notifications?
While it is not enabled automatically, you may have mistakenly activated it through a pop-up while you paired new AirPods or when you upgraded your iOS 15.
How It Works?
The simple mechanism: Once you get a new message, Siri will play a tone before reading the sender’s name and the message aloud. If it is a lengthy message that has been received, Siri will just announce the name of the sender and that you’ve received a message.
If you have no idea how to turn it off, we’ve got you covered.
We are going to offer guidelines on how to stop AirPods from reading texts both for iPhone and Apple Watch.
And if (for whatever reason), this explanation of the feature has motivated you to enable the functionality, we’ll walk you through that procedure as well.
Also Read: Best AI Voice Generators
How to Stop AirPods from Reading Texts from your iPhone
There are a couple of methods to stop your AirPods from reading your iPhone texts:
1. To disable Siri from reading the texts.
To do this: Open the Settings app on your iPhone, In the following step, hit and select Notifications. A fresh page will appear, with the “Announce Messages with Siri” dialogue box at the top.

You will see options ” Announce Messages with Siri” and “ANNOUNCE MESSAGES FROM.”
If “Announce Messages with Siri” is enabled, the toggle will be green.

To turn off the feature, tap the toggle and uncheck the “Announce Messages with Siri” box. The toggle should now be grey, meaning Siri won’t read out your texts to you again.

2. You can deactivate the Announce Messages functionality temporarily on your iPhone by going to the Control Panel.
Swipe down from the upper-right corner of the screen to enter the control panel, then click the Announce Messages icon to deactivate it. It will remain turned off till the time you turn it on again.

You can also deactivate it for a set period of time if you like. To do this, hold the Announce Messages icon down until a menu opens.
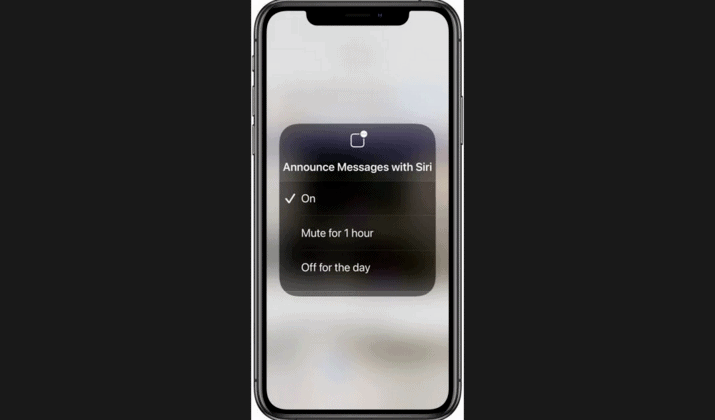
You can then select Mute for one hour or Off for the entire day. If you choose either option, the Announce Messages feature will be reactivated after the time period you specify.
How To Remove The Icon on Control Center?
If you’ve disabled the Announce Messages function in your settings, chances are you might want to take it off your control center since you won’t be using it.

Go to Settings, click on Control Center and search for “Announce Messages.” Tap the minus sign (-) by Announce Messages. And that’s all. You can re-enable it using the same steps.
How To Set “Announce Messages” For Different Apps?
When you allow “Announce Notifications” in AirPods, it applies to all apps by default.
But you have control over which apps from which Siri announces notifications. Apps that support the feature, both native and third-party, are mentioned at the bottom.
So, if you want Siri to chirp in your AirPods to indicate notifications, you may limit it to a minimum.
Here’s how:
1. On your iPhone, open the Settings app.

2. Tap on Notifications, then Announce Notifications.
3. There will be a selection of applications to choose from, choose the app for which you wish to activate or disable Announce Notifications on AirPods. Select the app.

4. Depending on what you want, turn on or off “Announce Notifications.”

You may do this further to enable/disable Announce Messages for all other apps you want by scrolling through and tapping on each app individually.
How To Turn Off Text Reading For Apple Watch?
One useful aspect of AirPods is that they can be used with your Apple Watch even when your iPhone isn’t nearby.
Fortunately, you can stop the Announce Messages feature on your Apple Watch as well, it functions similarly to using the iPhone’s Control Center.
1. Swipe up from the bottom of your Apple Watch to open the Control Center.
2. Then, to disable the feature hit the Announce Messages with the Siri icon.
Explore: Best Apple Watch Games

Alternatively, you can hold the icon to enter a menu where you can disable Announce Messages for an hour or the entire day. Whatever choice you choose, Announce Messages will be turned back on when the timer expires.
It’s worth noting that if you use suitable headphones that aren’t Apple AirPods, these instructions for turning off Announce Message through your watch may not work. You may need to repeat the preceding procedures using your iPhone.
How To Turn Announce Texts Back On?
Siri will be able to read your incoming text messages and iMessages from your iPad with iPadOS 15 or iPhone with iOS 15.
The feature demands that you must be wearing AirPods Pro, AirPods Max, Beats Fit Pro, AirPods (2nd generation) or later, Powerbeats Pro, Powerbeats, or the Beats Solo Pro.
Once that is settled, you may enable Siri announcements using the same process you used to disable it. But if you missed that part, proceed as follows:
1. Open Settings and then select Notifications.
2. Toggle the functionality by tapping the “Announce Notifications” button.
And that’s it! Siri will now read out practically every notification that arrives on your iPad or iPhone.
Enabling this function gives you access to a plethora of choices too.
This first is CarPlay with which you can configure Siri to either mute new messages, read new messages, or remember your former setting (this feature lets you use the message announcement setting you set previously for your car).
You also get to reply to the message that you’ve just received just by saying what you want back, without having to lift your fingers. If you have enabled the “Announce Messages with Siri” on AirPods, then here is how you can reply.
1. After Siri reads out a text message, Siri waits for a reply from the user.
2. Since you’ve activated “Announce Messages with Siri” on your AirPods, Siri waits for a response from the user after reading out a message.
You can also activate “Reply Without Confirmation.” This is used for apps that enable replies.
With this feature, Siri will repeat your message back to you before it is sent. You can disable it if you don’t care to check your messages once more before sending them.
Conclusion
That’s pretty much everything you need to know about the Announcing Messages feature.
If you have additional issues. You can check out this troubleshooting guide.
Enjoyed the post?