
Whether you’re a long-time iPhone user, or you’ve just gotten your hands on one for the first time, there’s a good chance that you’ll encounter the “iPhone is disabled. Connect to iTunes” message at some point.
This is one of the most common issues with iPhones, and it can be incredibly frustrating. It means your phone is completely locked, so you can’t access any of the apps or settings except for the emergency service.
Luckily, I’ve got you covered. In this blog post, I will walk you through exactly what caused the “iPhone is Disabled. Connect to iTunes” error, what you can do about it right now to fix it, and how to ensure this never happens again.
Let’s dive right in!
Also Read: How To Fix Apple Id Verification Failed Error?
Why did your iPhone get disabled?
The error message “iPhone is disabled. Connect to iTunes” is a way of telling you that you are locked out of your iPhone because you have made too many incorrect guesses on the lock screen or tried to unlock it with a passcode that no longer exists.
The first time you make a mistake entering your passcode, your phone will only ask you to try again. But if you input an incorrect passcode many times over, it will automatically send you an alert and lock your attempts until the specified number of minutes has passed.
Also Read: Why The Top Left Of iPhone Screen Is Blurry? How To Fix?
Here’s how this works:
- 6 consecutive incorrect attempts: Your iPhone will get disabled for 1 minute.
- 7 consecutive incorrect attempts: Your iPhone will get disabled for 5 minutes.
- 8 consecutive incorrect attempts: Your iPhone will get disabled for 15 minutes.
- 9 consecutive incorrect attempts: Your iPhone will get disabled for 60 minutes.
- 10 consecutive incorrect attempts: Your iPhone will get blocked, and you’ll get the “iPhone is disabled. Connect to iTunes.” alert.
After you get this last message, you won’t be able to access your iPhone’s data until you connect it to a computer with iTunes and enter the right passcode.
Unfortunately, if you can’t do it, Apple will force you to factory reset your device before allowing further access. This means that everything on your phone will be erased and returned back to factory settings.
Also Read: Notifications Silenced On iPhone – What To Do?
How to Fix “iPhone is Disabled. Connect to iTunes”?
Luckily, there are a few easy ways you can unlock your disabled iPhone. Below I will break down each one and explain step-by-step how they work.
However, before proceeding make sure you have a backup of your data!
Also Read: iPhone Won’t Restore In Recovery Mode. How To Fix?
Method 1. Link your iPhone to iTunes
You can connect your phone to iTunes on your Mac (or to Finder if you have macOS Catalina). This will allow you to unlock the device in just a few minutes, as long as you remember your Apple ID and password.
Here’s how to do it:
- Before anything, turn off your phone.
- Connect it to your computer using a USB cable.
- Now, open the iTunes app and wait for it to recognize your device. You can check by clicking on the icon of your device in the upper left corner of iTunes – if it’s not there, click on the device’s name under “Devices” in the left sidebar.
- Next, in the Summary tab, under your phone’s details section, click on the “Restore iPhone” button.
Check Out: How To Check Your iPhone For Viruses & Malware?
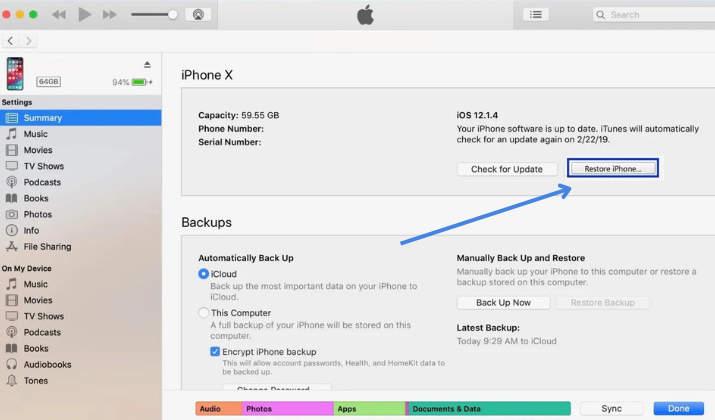
- This will open a pop-up where you’ll be asked to confirm your decision of restoring the phone. Click “Restore”.
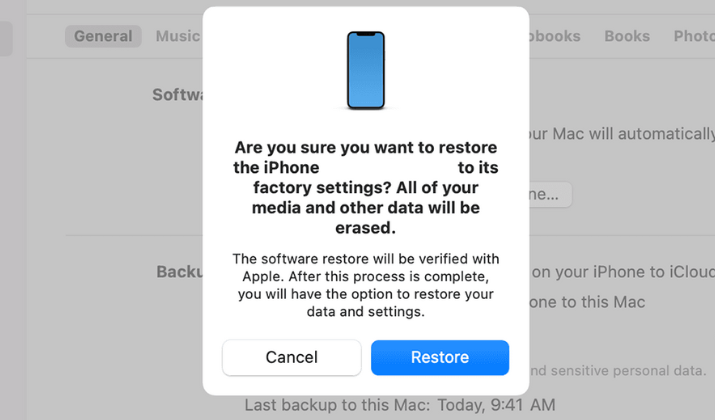
- After a few seconds, your PC will erase your device and install the most up-to-date iOS software.
- Before setting up this new iPhone, make sure to restore your data from a backup. Once you’ve done that, your iPhone will now be fully unlocked and working again.
You can also speed up this whole process. Here’s how:
- Firmly press both the Home button and the Sleep/Wake button until you see a pop-up message in iTunes saying it’s detecting an iPhone and prompting you to restore it.
- Click “Continue”.
- When prompted again, click “Restore”.
- Wait while iTunes restores your iPhone to factory settings and then syncs back up with iCloud or whatever service you use.
Pro Tip: If you are having issues connecting your device to iTunes, try installing the latest version of iTunes from apple.com/itunes/. This will ensure that you have the most recent updates for both iTunes and iOS, which could prevent communication between your computer and phone.
Check Out: How To Find Hidden Apps On iPhone Home Screen?
Method 2. Use iCloud
While connecting your phone to iTunes should be enough, sometimes it may not work. If this is your case, another easy way to unlock your disabled iPhone is to use iCloud.
As in the previous method, you will have to remember your Apple ID and password. However, the process will not take you more than five minutes.
To fix the “iPhone is Disabled. Connect to iTunes” error with iCloud:
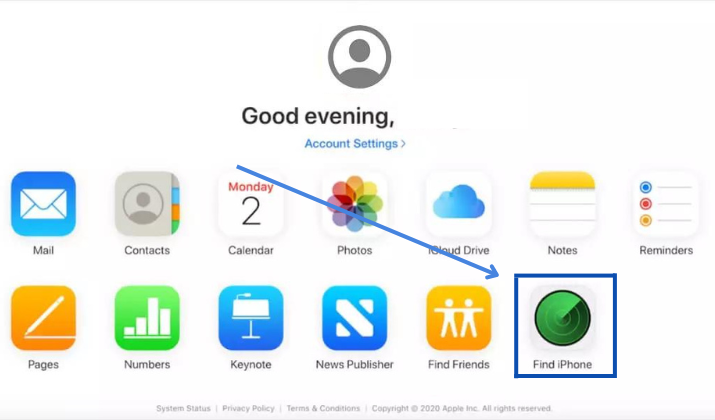
- Go to iCloud.com.
- Click the “Sign in” button and enter your credentials.
- Now, from the “All Devices” page, select the “Find My iPhone” option.
Also Read: Ways To Retrieve Deleted Text Messages On iPhone
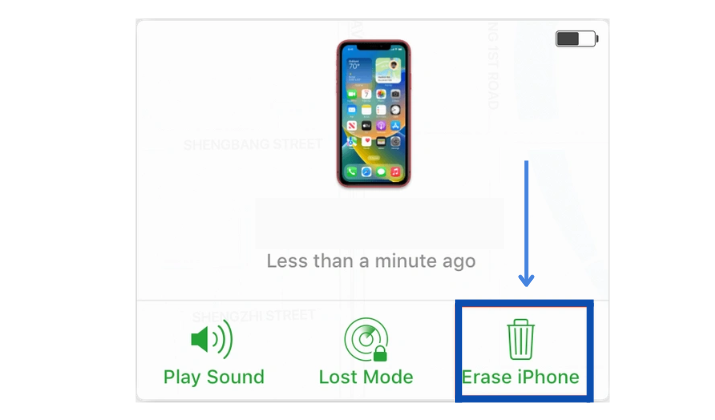
- Choose your phone and click on “Erase iPhone”.
- This will trigger a warning message where you will be asked to confirm that you want to erase your device. Hit “Erase” again.
- Next, enter your Apple credentials and click “Continue”. After a few seconds, your iPhone will be completely wiped.
- Once the process it’s done, restore your device from an iCloud backup to get your data back.
Also Read: My iPhone Won’t Turn Off Or Open Apps. How To Fix?
Method 3. Download the UnicTool LockEraser app
If your iPhone is still disabled after you have tried the tricks mentioned above, your only hope is to use a tool such as UnicTool LockEraser.
This app can instantly remove the lock on your phone and bring you back in control of your device. It’s also especially useful if you’ve broken your screen and cannot enter your Apple ID to get past the lock screen, or if your touch and face IDs aren’t working.
Now, to get rid of the “iPhone is Disabled. Connect to iTunes” error, UnicTool LockEraser deletes the user data on your iPhone that’s causing the problem you are experiencing and then reboots into a new mode.
That’s why you need to check that you have a backup of your iPhone’s data before using it. If you do, just follow these simple steps to download and install the app:
- Navigate to Unictool.com, and go to “Products” > “LockEraser”. You can also click here to get to the app’s page directly.
- Click on “Download” and follow the on-screen instructions to complete the installation process – it takes less than a minute.
- Once it’s done, launch the app. The main window will display four options “Unlock AppleID”, “Unlock Screen Passcode”, “Unlock Screen Time Passcode”, and “Bypass MDM”.
Also Read: Best iPhone Widgets
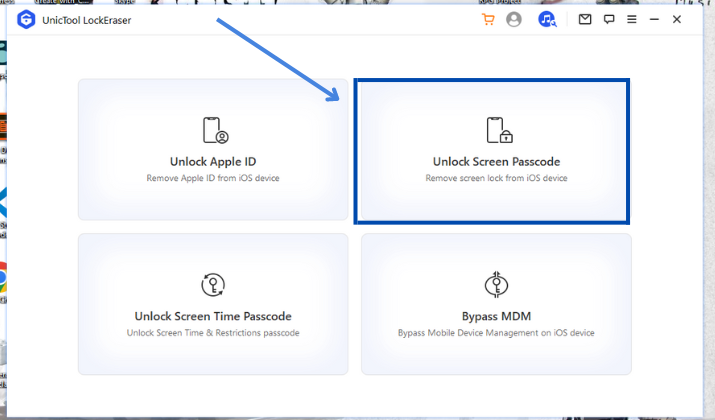
- Choose the “Unlock Screen Passcode” option.
- Next, enter your device’s firmware version and click on the “Download” button.

- The app will take three to five minutes to install your package. Once it’s done, hit “Unlock”.
- After a few seconds, the process will be done. You will get a notification and you will be able to start using your iPhone to its fullest again!
Also Read: Difference Between No Location Found & Location Not Available In Find My App
Final Words
If you are getting an “iPhone is Disabled. Connect to iTunes” message, you can use the above solutions.
These are all tried-and-tested methods that will help you fix the problem easily and in just a few minutes.
If none of them apply to your situation, you aren’t very comfortable with technology, or you don’t feel confident moving forward with them on your own, I recommend contacting Apple support or taking your device to an Apple Store so they can attempt to unlock it for you.


