
Google Earth is a program that allows you to see up-close satellite views of the earth. You can pick a point anywhere in the world and zoom in to see it up close.
Not only Google Earth, you can find several alternatives to Google Earth that provide satellite imagery. You can try Marble, NASA Worldview, and Satellites.pro.
Though the best Google Earth alternative is Zoom Earth. You can access it from your browser unlike Google Earth that requires you to download the app for advanced features. What’s more, with Zoom Earth, there are no privacy concerns.
About Google Earth & What’s the need to look for alternatives
Google Earth actually uses a collection of different types of images – it doesn’t rely solely on satellite imagery. In addition to satellite pictures, it collects aerial photos from aircraft.
When you zoom in, you will also see Street View photos, which are up-close images of buildings, streets, and landmarks. Street View photos are taken by Google Street View cars, which drive around different areas in countries all across the globe and take pictures.
You may have even seen those Google cars yourself.
Google Earth will typically give you a specific date or date range for satellite and aerial photos. If you see a date range, it means the image may be multiple photos merged together in a seamless photo.
In other words, Google Earth isn’t always updated in real time. You may be looking for an alternative that is updated more frequently.
Google Earth is mostly aerial-based and even land-based (from pictures taken by Google cars), especially as you zoom in, rather than being mostly satellite-based.
However, the main reason people look for a Google Earth alternative is that they don’t trust Google. Google is known for its data collection practices, and some people prefer not to use Google altogether so as not to support those data collection practices and give over data to Google.
Also, Google Earth isn’t open source. If you’d prefer an open-source program that displays satellite imagery of the earth, you’ll need something other than Google Earth.
Today, I’ll be showing you the top Google Earth alternatives that are better for privacy or offer other advantages over Google Earth.
Best Google Earth Alternatives
1. Zoom Earth

Zoom Earth is, by far, the best alternative to Google Earth you will ever find. It shows you satellite weather patterns right from the get-go, which is pretty cool, but you can also zoom in to see up-close images of streets and buildings.
You can see where it is snowing, raining, or hot just by looking at the map. Also, you can hover your mouse over the different areas on the map to get some more information about the specific type of weather certain regions are experiencing (light rain, light snow, etc.).
You can turn the rain radar on or off on the right side of the screen. In addition, you can turn on wind animations to see where the wind is blowing or a heatmap showing areas that are experiencing wildfires or immense heat (the heatmap is updated daily).
When all three are turned on, it will look like this:

When you click on the search button at the top of the screen, you will see the latest tropical storms; you can click on any one of them to track them.

Zoom Earth doesn’t have the same privacy concerns as Google Earth. Also, when you zoom in to any area, one thing you will notice is the excellent camera quality, as in the following screenshot:

The camera quality is easily comparable to Google Earth.
Zoom Earth has other useful features as well. For example, you can measure the distance between any two points on the map; you can also measure a specific area.
By opening up the menu on the left side of the screen, you can add different overlays. They allow you to show country borderlines, the day-night line, and more; you can also switch to HD satellite view when available.
Zoom Earth is available right from your browser, so you won’t have to download anything, unlike Google Earth, which requires the Google Earth Pro app for the more advanced features.
Discover the best alternatives to Zoom Earth in this post.
2. NASA Worldview

Do you want an alternative to Google Earth, but without the data and privacy concerns? NASA Worldview allows you to see images of the globe, straight from NASA!
Whether you are a science geek or simply want to see interesting images of the earth, NASA Worldview is the perfect app for you. You can track tropical storms, see wildfire activity, and see city lights across the world.
You can even show coastlines, borders, and roads for reference. Historical data is available if you’d like to see how the globe changed over time.
To compare how a region looked at different time points, you can click on the “Start Comparison” button on the left side of the screen. There are a few ways to compare two dates.
For example, you can use a moveable slider to move back and forth from one date to another, with the images from each date on one side of the screen. Or, you can use an opacity slider.
You don’t have to use the comparison tool to see historical data. Instead, you can use the ruler at the bottom to select a date from the past. Just pick any date from the ruler to see the globe as captured by NASA’s satellites on that day; use the back button to go further back in time.
Users can save snapshots or GIFs of the map to share with friends. To take a snapshot of the map, click on the camera icon at the top-right of your screen.
By default, you’ll see the natural color of the earth, as captured by NASA’s satellites. However, if you’d like to change that to see different data, you can click on the orange “Add Layers” button, which appears on the left side of the screen.

There are so many layers available, making NASA Worldview the best Google Earth alternative for science nerds. There is so much information you can see, including:
- Dust storms
- Air quality
- Fires
- Drought
- Ash plumes
- Vegetation
- Severe storms
- Floods
- Dams
- Earth at night (lights)
- Freeze/thaw
- Sea surface temperature
- Canopy characteristics
- And many others
The layers are conveniently grouped by science discipline and hazard type. However, you can also use the search bar to find a layer if you can’t see it on the list.
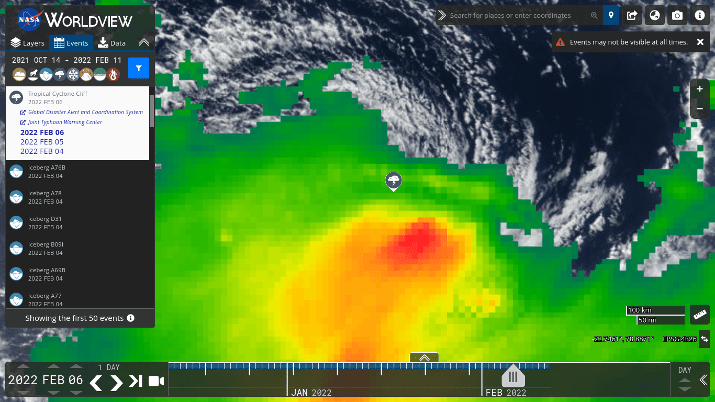
On the left side of the screen, you’ll see an “Events” tab, next to the “Layers” tab. You can click on it to see past storms and other natural events.
By default, you’ll see the past 50 storms. You can filter for specific types of natural events, like volcanoes or wildfires, using the icons that appear before the list of storms.
Just click on any storm from the list to see it on the map, as in the following screenshot:
Until now, we’ve explored how to use NASA Worldview to see more general snapshots of the globe. However, that doesn’t mean you can’t zoom in like you can on Google Earth.
To see a specific city, landmark, or address, simply type it into the search bar at the top of the page.
To be fair, you can’t zoom in as close as you can on Google Earth. NASA Worldview isn’t meant for that.
However, what you can do is zoom in close enough to see weather patterns or other information for a specific area.
All in all, NASA Worldview is one of the best alternatives to Google Earth for research purposes. The data is extremely accurate, coming from NASA itself, the tool is free, and there is a wealth of information that you just won’t get from Google Earth.
Being that it is accessible from your web browser, you can use it on any computer, without downloading any software.
Also Read: Best Mileage Tracker Apps Reviewed
3. Marble

Marble is an open-source alternative to Google Earth available for Windows, Mac, Linux, and Android as a downloadable software program.
When you are zoomed out, you can use satellite maps, while you can zoom in to street level for street view images, powered by OpenStreetMap.
OpenStreetMap, or OSM, is a community-owned street map and street view program, and it’s integrated into the Marble software program.
OpenStreetMap is the equivalent of Google Maps & Google Street View, but many people prefer it to Google Street View.
The main difference between OpenStreetMap and Google Maps is that Google Maps is not community-owned, while OpenStreetMap is, and all edits on OSM are submitted by users.
In other words, think of OpenStreetMap like Wikipedia. Wikipedia is open, and anyone can edit a page; the same applies to OpenStreetMap.
That means that in some countries that are harder to reach, OSM might be more accurate than Google Maps, because OSM users can upload edits in real time.
Even Google started to realize the importance of user-submitted data, which is why it allows users to edit and add roads on Google Maps. However, this feature is only available in around 80 countries, and Google will still vet all contributions before updating a map.
Other types of maps you can see include atlas maps, topographic maps, and even planet maps. One really cool feature is the ability to go back in time and view a map of the globe how it looked in historical times, centuries ago.
Various overlays are available as well. They allow you to get a view with a lot of information, including:
- Real-time traffic
- Cloud cover
- Weather information
- Postal codes
- Earthquake data
- Wikipedia articles related to each place
Marble is not only a satellite view program but also navigational software.
You can calculate routes for driving a car, riding a bike, or walking, both online or offline. That is available as an in-app download in the desktop app, but it will soon be available in the Android app as well.
Marble also has an offline mode, which Google Earth currently does not offer.
4. Satellites.pro

Satellites.pro is a free and safe Google Earth alternative. Unlike Google Earth, which limits you to its imagery and data, Satellites.pro doesn’t provide its own data but allows you to switch from several data sources.
Data sources include:
- Esri
- Google Maps
- Apple Maps
- OpenStreetMap
- Mapbox
- Yandex Map
Satellite view isn’t available from all sources. For example, OpenStreetMap only provides maps and street view, not satellite view.
Nevertheless, satellite view is available from sources such as Google Maps, Apple Maps, and Esri. Switching from one satellite view to another can help you get more accurate data, and it’s also a lot of fun, especially for nerds!
In addition, you can easily switch between satellite view, street maps, and weather maps.
Furthermore, you can see the weather forecast for the area you are focused on by looking on the left side. Click on the weather icon to see weather information such as:
- Temperature
- General weather conditions (cloudy, sunny, etc.)
- Wind speed
- Humidity
- Pressure
You can also expand the weather view to see more detailed information on Satellites.pro.

Click on “Weather Forecast” to display a graph of the temperature in that area by the hour, as well as the weather forecast for the upcoming days, including general weather conditions and highs and lows.
It will also show you a precipitation forecast, so you can decide whether to go out with your umbrella or not.
5. ArcGIS Map Viewer

ArcGIS, by Esri, provides map and satellite imagery for mapping purposes. Unlike Google Earth, it’s aimed at companies and individuals who want to make maps highlighting specific data for analysis purposes.
Let’s take a look at Map Viewer, a cloud-based ArcGIS app available for free in your browser. You’ll start off with a pretty standard topographic map, but the magic comes in the layers, which allow you to visualize data across regions.
Before we get into the layers, however, it’s important to note that you don’t have to stick with a topographic map, although it may not be obvious at first.
Click on the Basemap button in the left-hand menu (fourth option from the top) to change the style of your map. Available maps include:
- Satellite imagery
- Satellite imagery hybrid, which includes street data along with satellite imagery when you zoom in
- Street map
- Street map (night version)
- Terrain with labels
- National Geographic map style
- OpenStreetMap
- Light gray canvas
- Dark gray canvas
- Human geography map
- Newspaper map
- Charted territory map
- Mid-century map
- And many others
You can play around with the different map styles to see which one you like best. Furthermore, you can zoom in as much as you want to see up-close details, depending on the map style you chose.
For example, here is the satellite map, zoomed in to some random place in the United States:

Back to layers.
Click on “Add Layer” to choose from one of the available layers, which include:
- Recent earthquakes
- Current wildfires
- Short-term weather warnings
- Wind gust forecasts from the National Weather Service
- Active hurricanes, cyclones, and typhoons
- Recent hurricanes, cyclones, and typhoons
- And thousands of others!
There are currently over 4,300 layers you can add to the map, allowing you to visualize a lot of data and compare regions.
There are even layers in other languages, as demonstrated in the screenshot above. So, you can search for a layer in English or any other language and use what’s available.
The vast range of layers means you can use ArcGIS Map Viewer to visualize a lot more data than possible with Google Earth. Google Earth is more for curiosity than advanced research.
Each layer comes with helpful information, such as the source for the data and symbology, allowing you to accurately interpret the different symbols that show up on the map after adding the layer.

You can also add filters to filter for the data that is most important to you. Furthermore, you can select different layer styles to visualize the data in a layer in different ways, depending on how your brain works best.
Layer styles include heatmaps and bubble maps.
You can also customize the map layer by changing the color and contrast or adding different effects, like:
- Saturate
- Blur
- Grayscale
- And others
These effects can be added to the entire layer; alternatively, you can use a combination of effects to highlight specific features while de-emphasizing others.
You can also enable clustering to cluster certain data points from the layer together. Using the cluster radius slider, you can choose how close the different data points need to be for them to be clustered together as one data point.
Until now, we’ve talked about adding layers to topographic maps. However, layers are just the beginning; there are many other ways to visualize a map, including tables.
You can print maps using the print button.
All in all, ArcGIS Map Viewer is an excellent alternative to Google Earth, with a lot more exploration and data discovery opportunities.
6. Mapbox
Mapbox is a satellite map and mapping tool. What really impressed me was the quality of the imagery.
To use Mapbox as a mapping tool, however, you’ll need to sign up for a Mapbox account. Then, you can start using Mapbox Studio, which allows you to create your own map styles.
Mapbox gives you more control than Google Earth in terms of how you want your map to look.
For example, once in Mapbox Studio, you can choose from different tilesets, including satellite, terrain, and others. Once you do that, you can hide or unhide layers.
You can also upload your own data to create your own tileset. You can also create your own map styles.
In short, Mapbox is a good Google Earth alternative for companies and advanced users wanting to create custom data visualizations using maps. It also has other products for businesses. Companies like Instacart and General Motors use it.
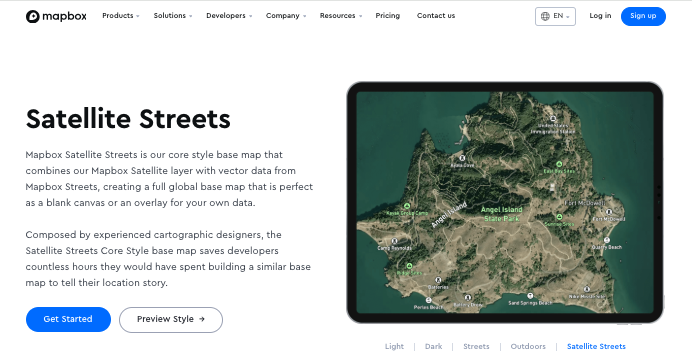
If you are just a user, you can use the Mapbox Satellite Streets map to explore satellite images from around the world, with the ability to zoom in and see up-close imagery of streets and terrain.
The Mapbox Satellite Streets map, by Mapbox, doesn’t require you to sign up or create an account, making it a good Google Earth alternative for users who want to boycott Google.
7. Earth Nullschool

8. Planet Explorer

Planet Explorer is an excellent Google Earth alternative with a lot of visualization options and tools.
It’s a web application from Planet.com, which provides satellite imagery solutions to businesses; you must create an account and sign up for a free 14-day trial to access Planet Explorer.
At the bottom of your screen, you’ll see a timeline, allowing you to go back in time to see data and maps from different time periods.
One thing I really liked was the Stories feature. It allows you to create a video made up of satellite snapshots of an area or landmark at different times.
Just select the images you want to include in your story from the available imagery, create your video, and publish it.
According to Planet, one difference between Planet Explorer and Google Earth is that Planet aims to update its imagery of the globe every day. As a trade-off, the imagery may be of lower resolution, as it relies on smaller satellites that can travel longer distances and take photos of the entire globe.
If you want satellite images that are updated daily, Planet is worth considering.
Wrapping It Up: What Is The Best Google Earth Alternative?
Zoom Earth is the #1 alternative to Google Earth, especially if you don’t want to use Google due to privacy concerns.
With such detailed weather data and so many advanced customization options, Zoom Earth has a lot of information for you, and for free!
Enjoyed the post?


