
SharePoint has won a number of industry awards for secure document management, website integration, team collaboration, and more. Thousands of global organizations use the software to connect and collaborate.
Launched in 2001, SharePoint has been steadily growing in popularity to become a leading collaborative platform that provides innovative solutions to help improve data management and simplify daily business activities.
If you want to leverage this powerful tool in your own business, read the rest of this beginner’s guide where you will learn how you can get the most from SharePoint.
But first, the basics.
What is SharePoint?
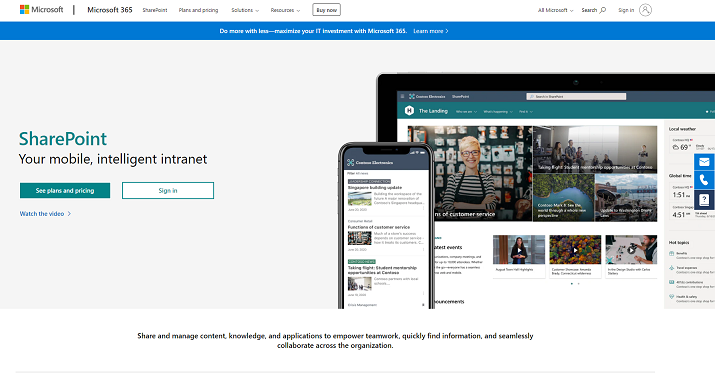
SharePoint is a web-based collaboration system developed by Microsoft to help business teams work together more effectively. It’s a place you go to work with others and also to stay informed about the latest industry news and trends.
The collaboration portal allows you to create intranets to store, organize, and share information from one centralized platform. It comes with a built-in content management system (CMS) and is a great alternative to network drives and cloud DMS tools like Google Drive, Dropbox, or OneDrive.
The reason for this is that it offers advanced features that go beyond a simple document repository or library, such as interactive workflow processes that can be automated between business units.
The software also gives organizations stronger control over how information is accessed and it comes with a wealth of other awesome features.
In this guide on “How to Use SharePoint”, we’ve tried to cover everything you need to know about setting up SharePoint and making the most out of your SharePoint intranet. However, understanding SharePoint is just the beginning. To truly unlock SharePoint’s potential, you need to see what others have achieved. That’s why we’ve compiled a list of the “15 Best SharePoint Website Examples“, offering you a glimpse into some successful SharePoint deployments. Check out these examples to gather inspiration and ideas for your own digital workspace. Find them here.
Here’s a quick look at some of the features of this powerful knowledge management system:
Notable SharePoint Features
- Collaboration Features: This highly flexible platform makes it easy to collaborate with both internal and external resources. The admin can assign tiered permission levels to individuals and teams.
- Project Management Features: You can also use the centralized document storage software to create a workflow that streamlines processes such as task handover, signoff deliverable files, approvals, client feedback, and more.
- Data Management Features: Data management becomes more and more challenging as businesses grow. SharePoint helps you deliver better productivity by making it easy to manage content, data, projects, websites, events, presentation stacks, and more.
- Seamless Integrations: Not only can you access SharePoint from any device or browser, but you can also use it to collaborate with team members using various other platforms in the Microsoft 365 ecosystem, as well as other collaboration tools like OneDrive, Microsoft Teams, Video, Stream, etc.
- Compliance: SharePoint has a Compliance Policy Center and In-Place Hold Policy Center that lets your central administration create and apply unique business policies.
Knowing the features of a piece of software is all well and good, but what does it mean to someone who’s a beginner, just getting started using the software?
Well, it means you get to experience benefits like the ones listed below:
SharePoint Benefits
- Increased Productivity: SharePoint saves you from wasting time digging through archives to find a specific file folder which helps to boost productivity.
- Enhanced Employee Interaction: SharePoint offers social networking tools that can help you improve employee communication, interaction, engagement, and morale.
- Better Document Management: Storing your documents in one central place reduces security risks and helps to lessen the incidence of slip-through-the-cracks mistakes.
- Simple Website Management: SharePoint makes it easy for you to create and manage internal and external sites for your business.
- Easy Scalability: This collaboration software is extremely scalable and you can change your subscription to accommodate more or fewer resources/projects.
- Multipurpose Usage: This productivity tool comes in handy regardless of your role within your company. You can use it for different projects and avoid multiple app purchases.
- Robust Data Security: The SharePoint ecosystem is trusted by governments and large organizations to protect their sensitive information thanks to its data security measures that prevent intellectual property theft.
This just scratches the surface of the benefits of using SharePoint. There’s also the fact that you save money by using one subscription for multiple processes.
If you already have a Microsoft 365 subscription, then you don’t have to spend on additional tools for both your professional and personal needs.
For a comprehensive understanding of SharePoint, click here to explore “What is SharePoint“.
How to Use SharePoint – A Step-by-Step Guide
Now that you understand the platform’s features and benefits, it’s time to learn how you can use that knowledge to your advantage to get the most from the software.
Below is a step-by-step guide to help you learn SharePoint so you can cut the learning curve short and hit the ground running.
Step #1: Register for a SharePoint Account
To get SharePoint, simply choose one of the three plans on offer on the website:
- Online Plan 1: $5/user/month: This is a basic plan that only includes SharePoint, OneDrive, and Lists.
- Online Plan 2: $10/user/month: This plan comes with unlimited personal cloud storage
- Office 365 E3: $23/user/month: This is the most advanced plan that offers access to Microsoft Office apps like Word, Excel, Outlook, and PowerPoint.
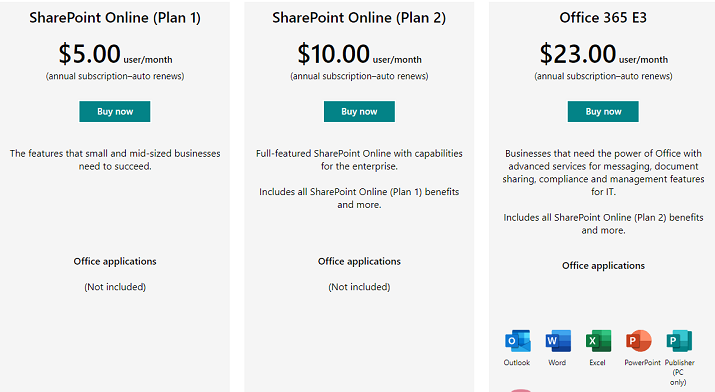
SharePoint Online is also available in Microsoft 365 small business, enterprise plans, and Office 365 enterprise plans.
You can try the software for free.
Simply click “Try for Free” and enter your email address on the homepage:
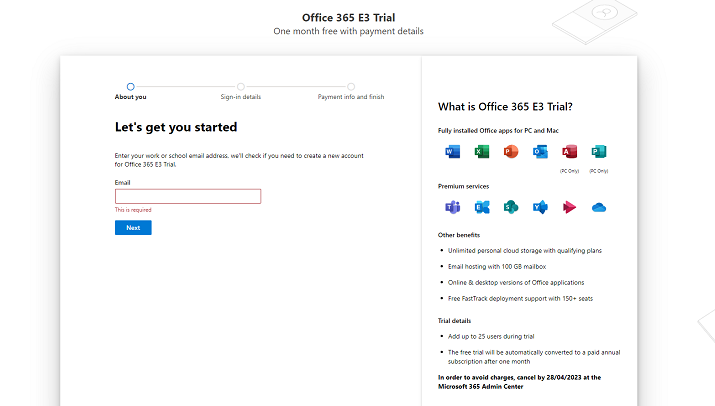
The SharePoint trial comes with fully installed Office 365 apps for PC and Mac.
You also get premium services and other benefits, such as unlimited cloud storage, email hosting, and the ability to add up to 25 users.
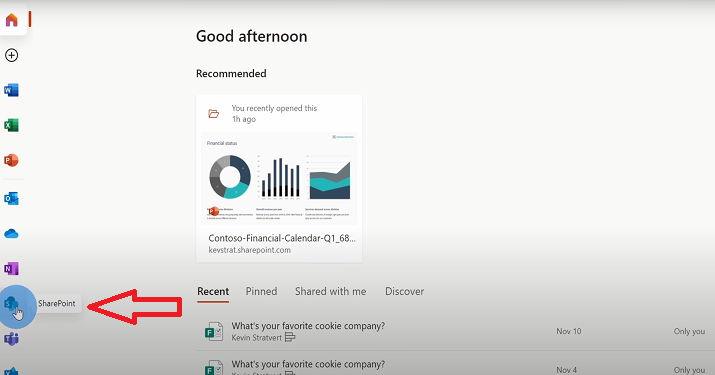
Once you’re done registering your new account, you can now use SharePoint for collaboration, content management, project management, and more.
Simply click on the SharePoint icon as shown in the image below:
You can create content and share links with anyone so they can access files and folders. They don’t even have to sign in to collaborate with you.
You can get the SharePoint mobile app so you can do your work from anywhere.
Simply enter your email or phone number on the site’s homepage and you’ll receive a download link.
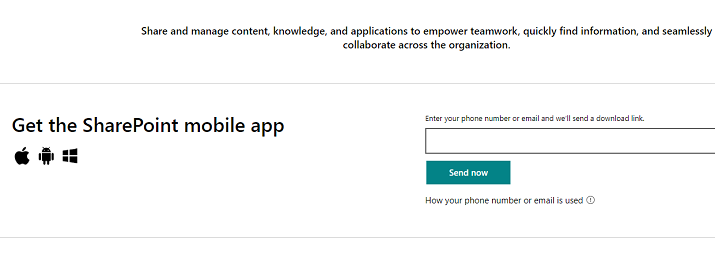
Follow the prompts to download and install the app and you’re now ready for seamless collaboration on the go.
The software easily pairs with other offerings from Microsoft, such as OneDrive for Business. It also integrates seamlessly with other cloud apps to simplify your work processes. This way, you don’t have to keep jumping from one app to another while working on your projects.
Step #2: Choose the Type of Content You Want to Create
SharePoint is known for its robust document management capabilities, as well as custom lists, intranet, and Wiki knowledge base.
The entire goal of the software is to be a convenient place where you can share everything from posts, images, videos, pages, and websites, to discussion boards, calendars, lists, and much more.
So, your next step is to decide what type of content you want to create or share.
Here’s a quick look at some of the most commonly used types of content on SharePoint.
1. SharePoint Sites
SharePoint’s web collaboration system uses building blocks like sites, pages, and web applications (also known as web parts) to create, organize, and store specific types of content.
A site is basically a collection of different types of content, such as:
- Pages
- Lists
- Calendars
- Libraries
… and other apps
This feature makes it easy to build and manage internal and external websites for your business or for personal use.
You can create subsites under your main SharePoint site. You can think of this as creating larger folders within your file system. This allows you to easily collect related materials and content that deserves its own focus.
For example, you might create individual sites for:
- Blogs
- Meetings
- Documents
- Teams, etc.
SharePoint has two main types of sites that you can create, Team sites and Communication sites.
- SharePoint Team Site: You can create a site for each team to make document sharing and collaboration easier.
- SharePoint Communication Site: This type of site comes in handy when you need to share content or make announcements. It allows you to easily broadcast any message to a wide audience.
2. SharePoint Pages
Pages in SharePoint are key collaboration tools that you can use to present content to other users. There are two main types of pages, Navigation pages and Destination pages.
- Navigation Pages: These pages act as a sort of landing page or homepage for users to navigate your website. For instance, you might have a homepage for your company’s intranet that presents high-level information and all the different categories users might be looking for.
- Destination Pages: This is where you’ll have the content that users are looking for. These pages are typically built around specific topics. For instance, if you create a team for “company culture”, a dedicated SharePoint website will be created automatically to store any content and resources related to this team. You might include links from your homepage pointing to this content.
When crafting your SharePoint sites and pages, it’s important to give enough thought to your information structure.
Carefully plan the combination of your navigation and destination pages to ensure easy navigation and a seamless end-user experience.
3. SharePoint Lists
If you can think of the SharePoint site as a box with different types of content inside of it, then a list is essentially a table with the information contained in each row.
It’s no different than the tables you create in Word or Excel, except that a SharePoint list comes with powerful features for versioning, content approval, and workflows.
Your list can be a collection of related items, such as:
- Links
- Announcements
- Calendars
- Contacts
- Suggested websites
… and much more
SharePoint also allows you to create custom lists in either list form or an editable datasheet. You can have a discussion board, a list of upcoming projects, an issue-tracking list, a survey, and more.
Furthermore, you can import spreadsheets from other apps, and even add a list of due project tasks using a Gantt-like chart. With SharePoint, the possibilities are endless!
4. SharePoint Libraries
SharePoint Libraries are similar to Lists, but, instead of just being a regular table for data or content management, libraries are tables of the actual documents themselves.
So, instead of adding your documents directly into a file folder, as you would with other document management tools, you will place them in a document library where there are columns that make it easy to organize, store, and find your documents.
You can upload Word files and other types of files to share with your team. Classify, tag, and categorize to your heart’s content so you never again have to waste countless hours digging through files to find the files you need.
Another great feature of the SharePoint library is that it allows you to check different files to ensure that they can only be edited by one person at a time.
You can also keep the revision history of each file so you can see the activity of any given document.
Libraries make it very easy to create a logical structure for your documents through the use of folders. The best part is that they’re not just for documents. You can also use other types of libraries, including:
- Picture Libraries: Use this to store your image files. These come in handy for bloggers, social media marketers, and other content creators who need a reliable way to store image files.
- Form Libraries: Use these to store XML forms for routing information through Microsoft InfoPath.
- Wiki Page Libraries: These provide you with a quick way to edit text that still remains on the web with links to other pages.
5. SharePoint Hub Sites
Hub sites are the key to creating a website structure that is logically top-down.
In the past, subsites did not adapt well if you made changes to the main site, but SharePoint’s site collections allow you to have greater flexibility so that you can make organization-wide changes to your content without breaking all the intranet connections in your content.
Now, as your business changes, so does your SharePoint. That’s because the hub sites model relationships between content as links, as opposed to ownership or hierarchy. This makes it a lot easier to adapt to high-level changes.
There you have it. The main building blocks of SharePoint.
You can create these and other types of content on any given site.
You can share these types of content with users within your organization’s network that you want to collaborate with, such as colleagues, employees, etc. You can also give access to people outside your network, such as vendors, partners, etc.
Step #3: Content Management – Understand the System

Now that you have your content, it’s time to understand how you can use the platform to share and collaborate with others.
SharePoint has a powerful content management system (CMS) that makes it easy for you to manage your site.
Publishing sites use CMS like WordPress, Joomla, etc., but this software’s CMS has a strong focus on ease of use, integration, and automation.
In fact, one of the biggest advantages of SharePoint as a CMS is that it provides teams with a Records Center that makes it easy to manage record storage and compliance.
With this powerful CMS, you can share data, files, news, and resources. You can also customize your website to streamline all your work.
The software makes it easy to collaborate securely and effortlessly across all types of devices.
Here are some of the basic features of the CMS:
- Content Creation: SharePoint makes it easy for users to create and edit content.
- Content Publishing: The software lets you publish content online in one click.
- Content Storage: The CMS stores content effectively and securely for easy recovery.
- Workflow Management: This feature defines how tasks are structured, as well as who performs them, how they’re tracked, and how information flows from one user to another.
Pro Tip: SharePoint Customization: SharePoint provides you with multiple options for customizing your dashboard. It’s a good idea to use the software’s out-of-box features as much as you can – after all, why pay for third-party apps when you can get the same functionality for free?
But, if you do need to customize the platform, the website has tons of resources, tools, and techniques to help you get started customizing SharePoint.
You can also learn how to build SharePoint Framework solutions, add-ins, and apps.
Step #4: Build SharePoint Communities
In addition to content creation, storage, publishing, and workflow management, this CMS also offers tools to create a social collaboration environment that you can use to boost engagement and morale in your organization.
With this feature, you can work, collaborate, communicate, and organize with multiple people from one convenient place.
You can create things like:
- Detailed user profiles
- Document libraries
- Shared calendars
- Discussion boards
… and much more
This is a great feature to leverage if your company culture involves engaging and informing your employees to build cohesion throughout your intranet.
You’ll be able to drive efficiency in your organization by sharing common applications and resources on your communication sites.
You can also use SharePoint Communities as a way to engage and inform your organization. For example, employees can stay in the know with targeted and personalized news whether on the web or on SharePoint’s mobile apps.
They can aggregate all of the news across the different sites that they are members of. If they don’t have time to read up on the posts, they can save them for later.
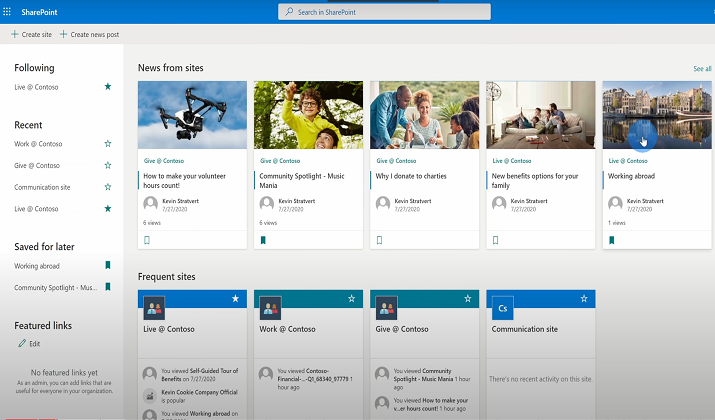
From that dashboard, users can also see all the latest activity, such as new news posts from the sites they follow.
Step #5: Set Permissions for Your Content
With SharePoint Groups, you can control access easily. Set permissions for groups or sets of users, rather than individual users. You can set different permission levels for each SharePoint group.
Permission levels are just collections of individual permissions, such as:
- Open
- View
- Edit
- Download
- Delete, etc.
Each time a user is added to that group, they automatically get the same permission level as the rest of the group.
Depending on the complexity of your needs (or those of your organization), you might organize users into various groups giving them different types of permissions.
Here’s a quick look at some of the different SharePoint groups that are automatically created when you create a SharePoint site using a standard template:
- Owners: These are the people with full control who will be able to manage site permissions, appearance, settings, etc.
- Hierarchy Managers: These users can manage the hierarchy of the group by creating sites, lists, documents, etc.
- Members: These users can view, edit, or contribute to site content. You still get granular control over permissions in this group.
- Quick Deploy Users: These users are allowed to contribute to the site. They can schedule content deployment jobs.
- Readers/Visitors/Viewers: They can see site content, but not edit or download it. You can further customize permissions for readers to allow them to view documents and pages but not versions, and so on.
Long story short, you get a list of approvers, and you can decide what they get to approve.
For example, you can have designers who have permissions that allow them to approve designs.
That is, the members of this group might have the ability to edit lists, pages, and document libraries on the relevant site. You might also allow designers to be able to create master pages, page layouts, etc., and make changes to the master page gallery.
3 Tips to Effectively Use SharePoint
It’s clear to see that SharePoint is the modern approach to team collaboration. It empowers teamwork through the use of dynamic and productive sites for every team, project, department, and division.
Here are a few best practices that all SharePoint users should know. As a beginner, these tips will help you use the tool in the most productive way possible so you can get stuff done effortlessly.
1. Have Consistent File Names: The more documents you have, the more important it will be to bring consistency to your file naming so you can quickly and easily find the information you need.
2. Use Tags: Even with a consistent naming convention, you might still have trouble finding specific documents. Use tags on each document to make it easier to locate files in each category.
3. Use the “Document Lock” Feature: Maintain the security of your data by locking documents so that no unauthorized persons can edit shared documents or files.
Conclusion
The key to using SharePoint successfully is to understand the platform’s capabilities as well as its technical limitations so you can make the best use of it in your own business.
Document management is the software’s strongest feature. The platform is also a great communication channel and it can be used to create a convenient intranet portal complete with landing pages.
SharePoint also serves as a solid knowledge base and can be an effective repository of information for custom apps and workflows.
All in all, this is an impressive tool with high-level capabilities. It’s the Swiss Army knife of collaboration and now you know everything you need to use this powerful software like a pro.


